Trying to reach your audience with a special message? Upload a custom video or PowerPoint content to play before any title in your Content Catalog. Bumpers are typically very short, like a commercial or trailer, and they are easily managed from the Bumper Manager.
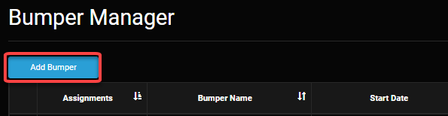
Bumper Manager
The Bumper Manager includes a list of the uploaded files and associated information.
- Assignments - List the number of titles in the Content Catalog to which the bumper is assigned
- Bumper Name - Lists the name of the bumper as a link. Click on the link to preview the video.
- Start Date - The first date the bumper will play before assigned content. If no date is set (displays none), then there are no restrictions and it will play until the End Date is reached.
- End Date - The final date the bumper will play before assigned content. If no date is set (displays none), then there are no restrictions and it will play once the Begin Date is reached.
- Edit - Clicking the Edit button will display the edit page for the bumper
- Delete - Clicking the Delete button will delete the bumper after clicking OK on a confirmation screen.

Navigation
Sort the list of bumpers by clicking any of the column headers.
Enter a partial name in the search field to filter the list of uploaded files.

Add Bumpers
To upload a file to use as a bumper, click the Add Bumper button.
Under Bumper Type, select Video file or YouTube, depending on where your file is hosted.
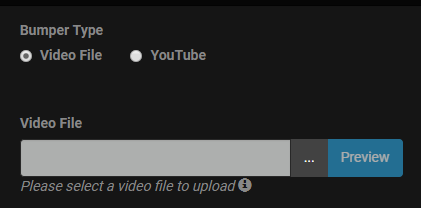
Upload a Video File
- Check your file to ensure that it meets the following specifications:
MP4
Video Codec: H.264, H264, MP4
Audio Codec: AAC
Profile: Baseline or Main
Maximum Video Bitrate: 3 Mbps
Maximum Audio Bitrate: 1 Mbps
2. Click the ellipses (...) and select the file to upload
3. Click the Preview button to preview your video
4. Add additional bumper data if desired (See Bumper Data below)
5. Click the Upload & Save button at the bottom of the page
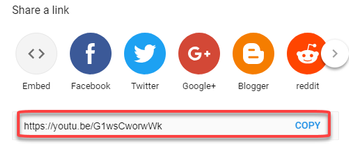
To Upload a YouTube Video
- Copy the YouTube URL from the web address bar or copy the link under Share
2. Paste the link into the YouTube Video URL field
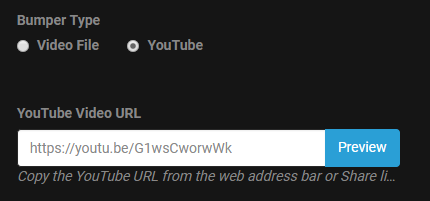
3. Click the Preview button to preview your video
4. Add additional information if desired (See Bumper Data below)
5. Click the Save button at the bottom of the page
Bumper Data
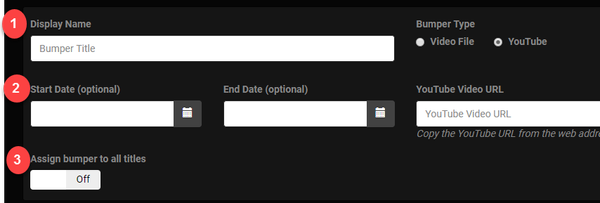
- File name - To change the name of the bumper, enter a title in the Display Name field
- Start Date and End Date - The Start Date is the first date the bumper will play before assigned content. If no date is set, then there are no restrictions and it will play until the End Date is reached. The End Date is the final date the bumper will play before assigned content. If no date is set, then there are no restrictions and it will play once the Begin Date is reached.
- Assign bumpers to all titles - When On, the bumper will play before all titles in a random order. When Off, the bumpers will play before assigned content.
Edit Bumpers
To add or replace a single bumper, click the ellipsis (...) button to upload a new file or add a new YouTube link.
When multiple bumper check boxes have been selected, the Bulk Edit and Bulk Delete buttons appear next to the Add Bumper button.

Bulk Delete Button - When Bulk Delete is clicked, the selected bumpers will be deleted after clicking OK on a confirmation screen.
Bulk Edit Button - When Bulk Edit is clicked, the Bulk Edit page is displayed.
