This will be the new page for v3.28
Automatic Categories
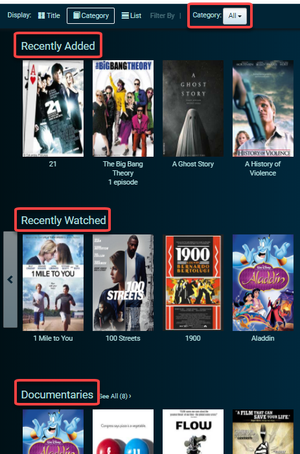
In the category view, you'll find two default categories specific to your campus:
- Recently Added - Quickly locate titles that were added to your library within the past 30 days
- Recently Watched - Identify titles trending on your campus

You can also filter by category using auto or custom categories.

...
Titles in the Content Catalog may be viewed by category, which makes it easy to browse the library. As an Admin, you have the option of enabling automatic categories and creating custom categories.
Automatic categories
Browsing the Content Library is easy when you enable any of the following automatic categories:
- Auto-Categorize on Ingest
...
- - When On is selected, new titles will be placed in a category that matches the title's genre (assigned by Swank) when it is uploaded. If no category exists for a genre, one will be created. You
...
- may also edit the category names
...
- .
...
- When Off is selected, new titles are placed in a default category.
...
- The default category
...
- may be renamed, and titles may be assigned or removed from the category.
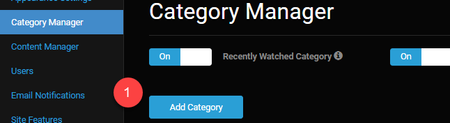
- Recently Added Category
...
- - When On is selected, the category is added to the Content Catalog to highlight new titles which have been added within the last 30 days.
...
- When
...
- Off is selected, the Recently
...
- Added category will not be displayed
...
- .
- Recently Watched Category
...
- - When On is selected, the category is added to the Content Catalog to highlight the titles which have been played on your campus in the last 30 days
...
- . When Off is selected, the Recently Watched category will not be displayed
...
- .

When the Category display is selected and the automatic categories are enabled, they appear in the Content Catalog along with a convenient filter.
Create a custom category
- Click From the Category Manager menu, click the Add Category button
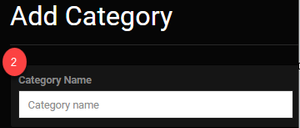
2. Enter a name for the category
...
3. Follow the instructions to Assign titles to categories or click the Save button
...

...
to assign titles to this category later
Once the category is saved, it will be added to the end of the Category Manager list, which means it will appear at the bottom of the Content Catalog. To rearrange the order of the categories in the website, follow the instructions to Organize categories.
Assign titles to categories
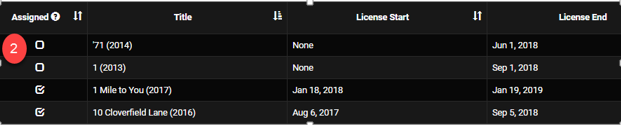
- Click in the field under the category, and a checkmark will appear. The title has been assigned to the category.
- Click in the field with a checkmark to remove a title from a category.
...
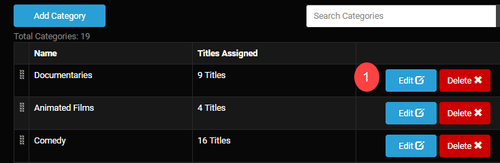
- In the Category Manager, click the Edit button of the category. If you just added a new category, go to the next step.
2. Search for the title and click the Assigned field. A checkmark will appear, which assigns the title to the category.
 \
\
3. Click the Save button at the bottom of the page.
| Info | ||
|---|---|---|
| ||
|
Delete a category
If a single title is assigned to the category being deleted, the title will automatically be re-assigned to the default category.
There will always be one default category that can be renamed, but may never be deleted. In the event that all other categories are deleted, then there will be at least one category remaining. Content does not have to be assigned to this category.
- Select the ‘X’ to the right of the category title

2. Confirm the deletion (only required if there are titles assigned to the category being deleted)
Organize the categories
- Hover your mouse over the category, and a drag bar will appear to the left of the title

2. Left click and hold the drag bar, then move the category to the desired location
Edit category titles
- Click on the title in the header

...
Edit titles within categories
Easily edit the titles within a category using the Category Manager. To edit categories by title, go to the Content Manager.
- In the Category Manager, click the Edit button next to the category.
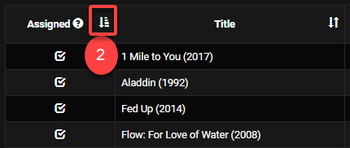
2. Click the Assigned header to sort the title list by the assigned titles.
3. To remove a title from the category, uncheck the Assigned field. To add titles to the category, check the field.
Edit category names
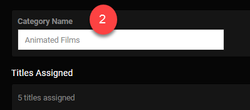
- In the Category Manager, click the Edit button of the category.
2. Type your changes in the Category Name field and click Save at the bottom of the page.
Organize categories
When viewing titles in the Content Catalog in Category view, all of the categories in the Category Manager will appear in the order you designate. Categories at the top of the list will appear at the top of the Content Catalog. If you have chosen to enable Recently Watched and Recently Added categories, these categories will always appear at the top of the portal and you may organize the remaining categories in the list.
- From the Category Manager page, click the icon next to the title and drag the category to the desired location to specify the order

2. Click Save at the bottom of the page.